Featured

Free Pattern: the Asana Leg Warmers

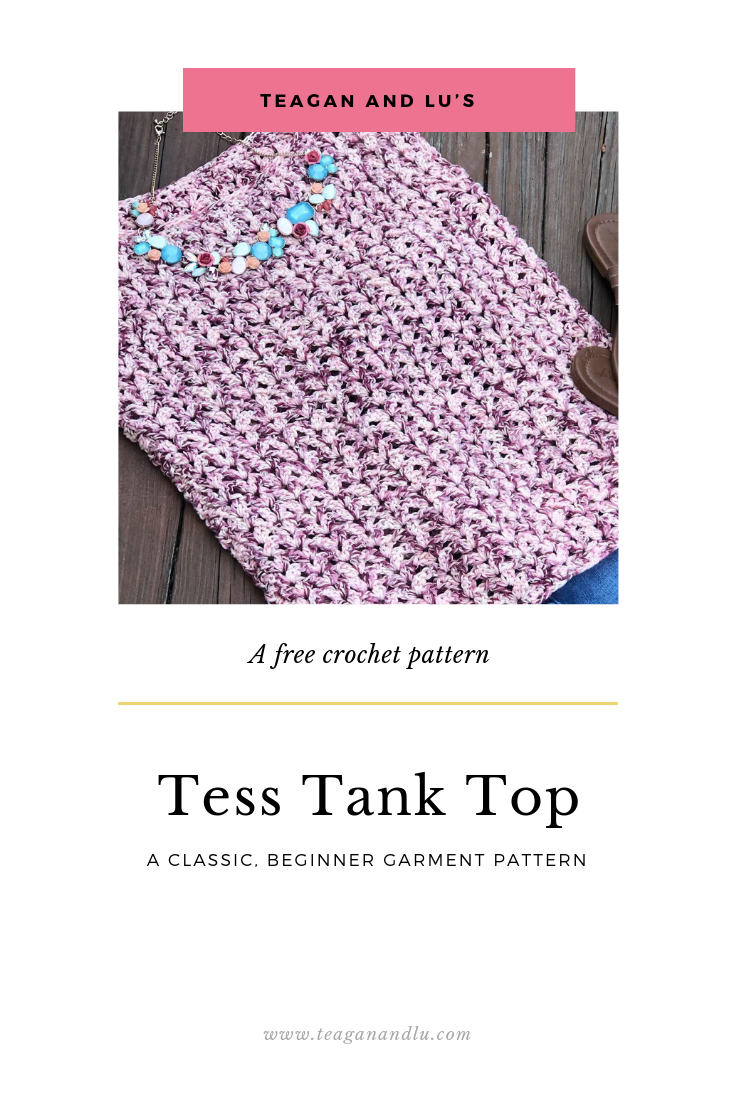
I can’t tell you how much joy it brings me to offer a NEW free pattern on my blog.

Truly don’t ask me how I got this photo. My husband walked in. It got awkward. Ha!

My absence from publishing was due to oh so many things: some contract design work with Darn Good Yarn which kept me busy and very happily stitching each month, a new full time job working in City Government that I finally feel like I’ve settled into, a wild whirlwind year of home schooling, flex scheduling, creative problem solving and staying-at-home-ing.

But here we are: back with my first free independent design since way too long ago. If you are new here: Welcome. If you’ve stuck with me: Hi Sweets. I appreciate you so very much.

On to the Pattern:

During this most tumultuous year, I’ve learned a lot about myself (cheesy but true). Following a health scare this year- which thankfully was easily cared for- I realized there is no time like the present to own my wellness, fitness and energy level. I’ve returned to a life of prioritizing movement, healthy habits and choices (not ALL the time, but none of us are perfect) so my upcoming designs are a nod to this change.

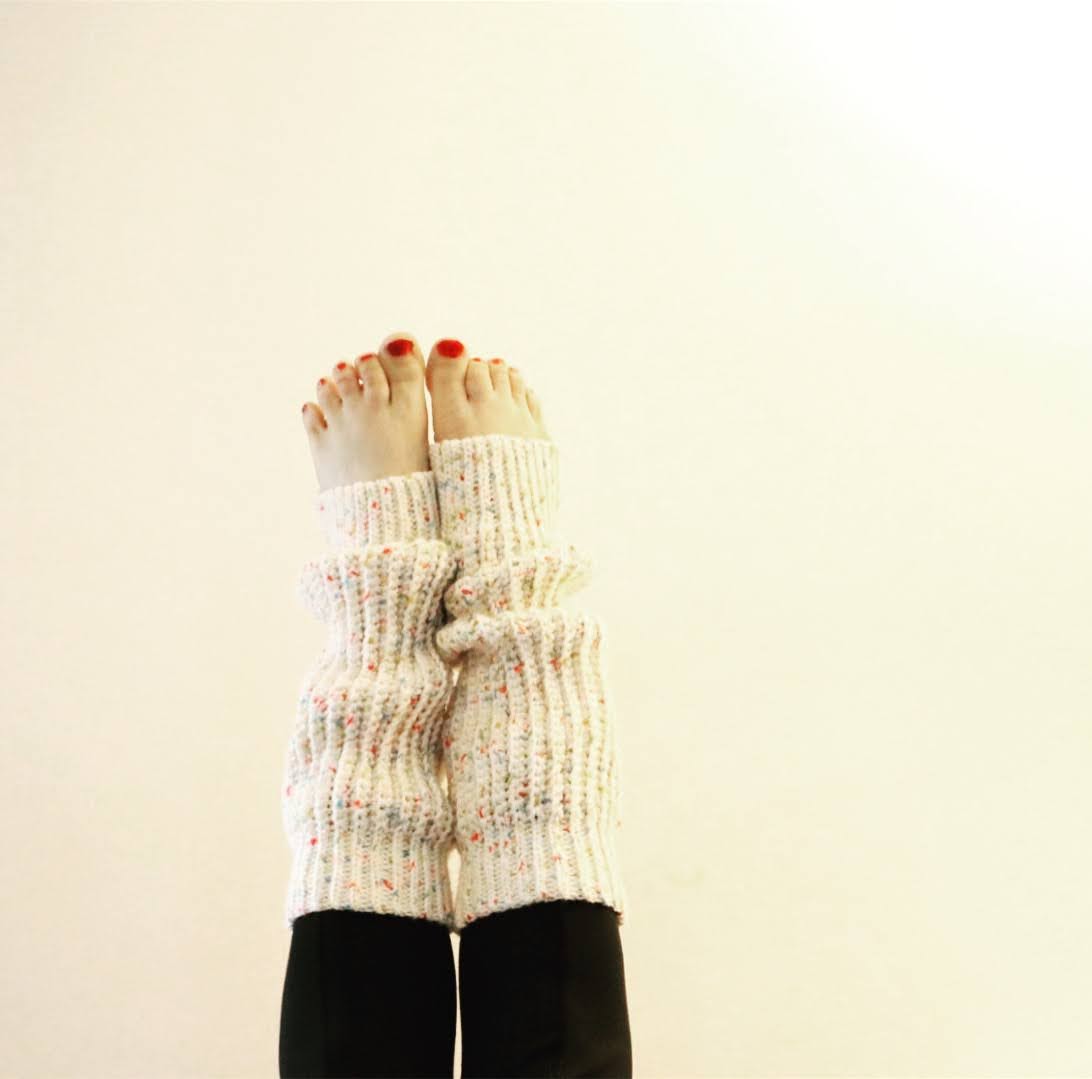
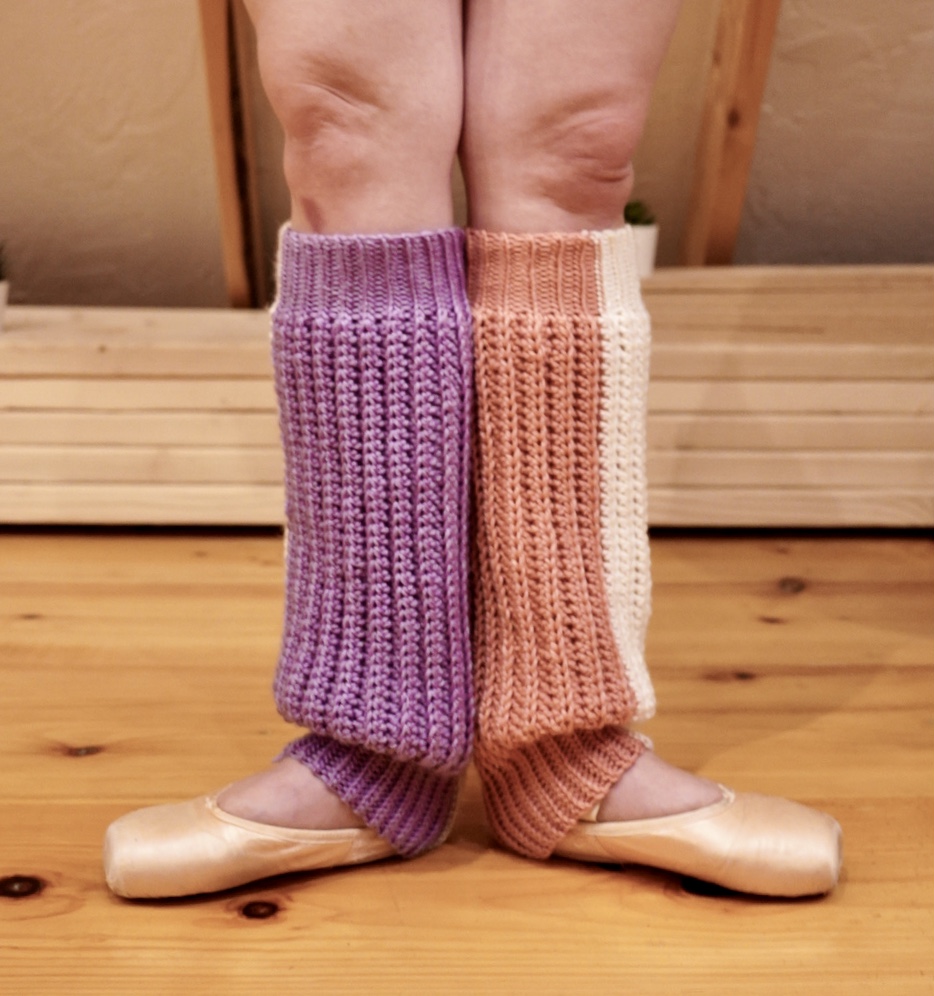
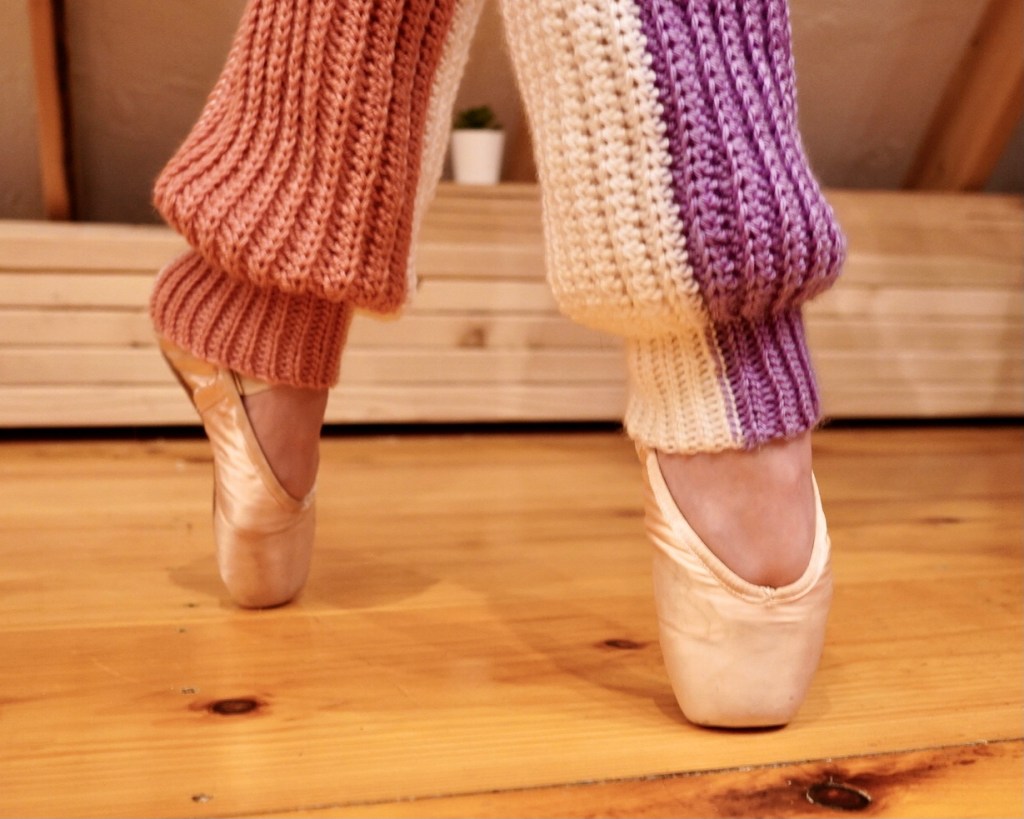
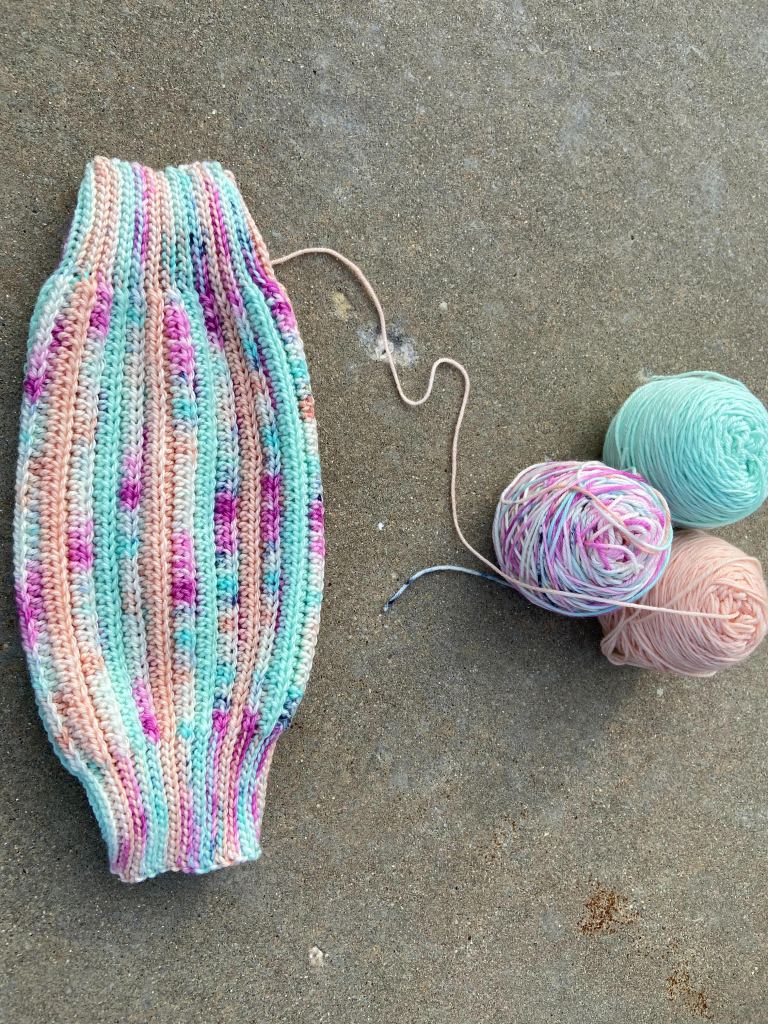
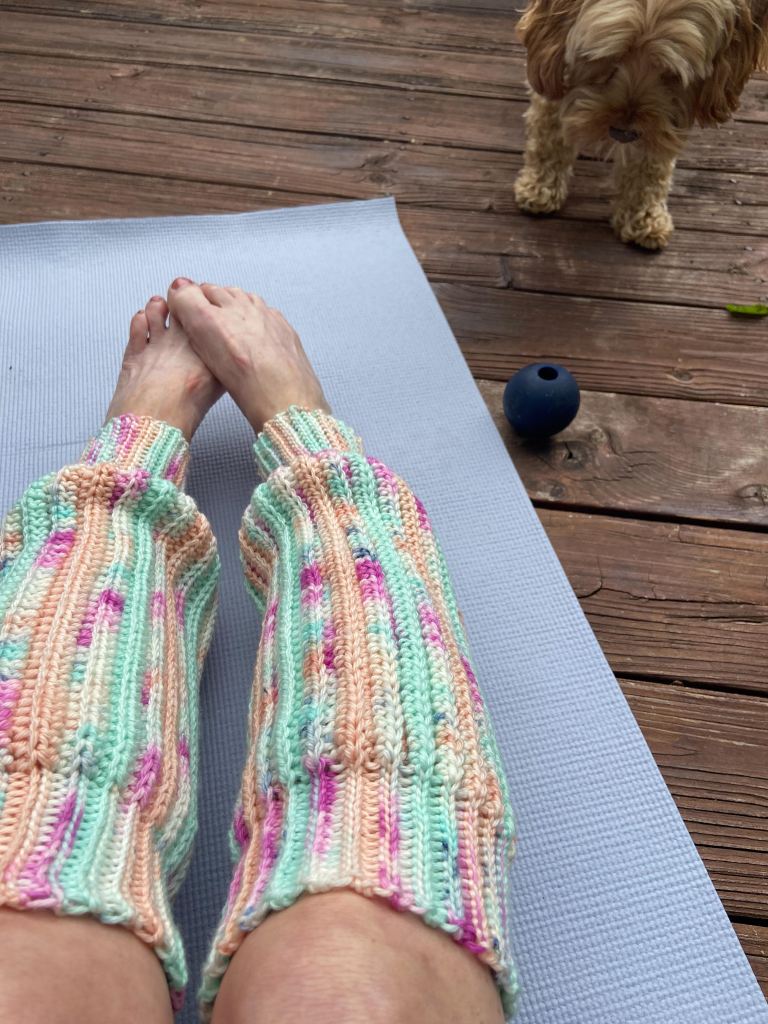
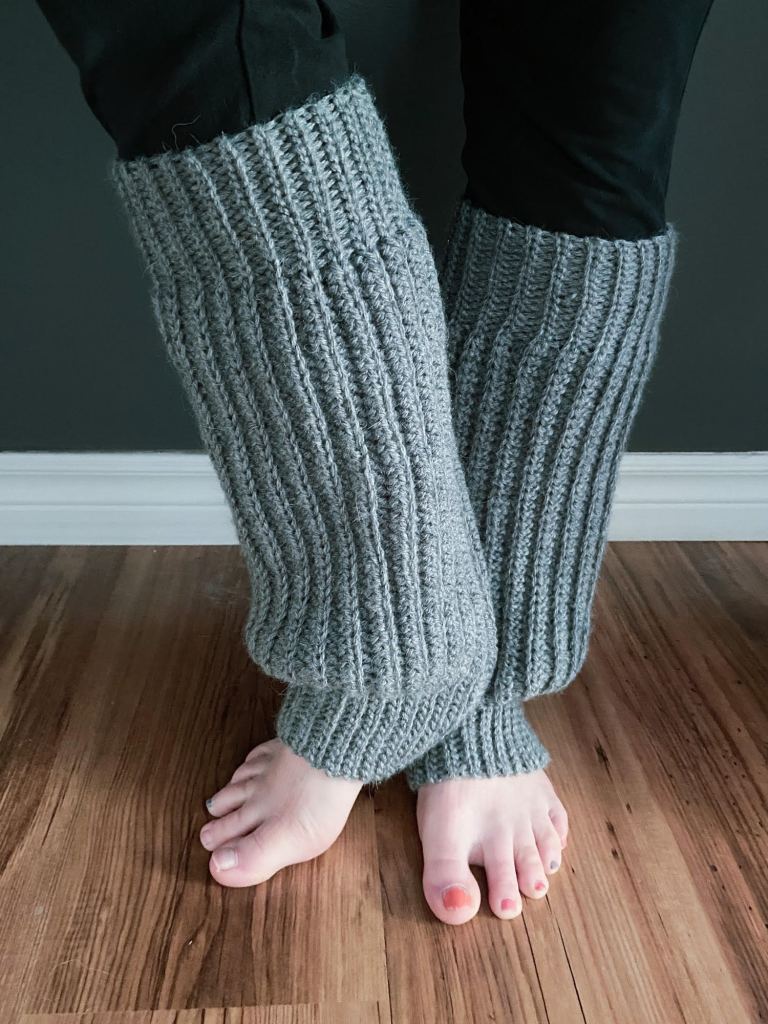
My first design are these Legwarmers that were born out of true necessity. I started attending early morning yoga classes in the winter, and found that it would take me a very long time for my joints—problematic joints no less— had a hard time warming up. So, I thought I’d try some leg warmers and they truly made a difference getting me prepped for a yoga session. Also, they’re real adorable. See below:

Please enjoy this free pattern, or if you are so inclined to help my yarny footprint grow- purchase the PDF pattern on Ravelry.

Pattern

Abbreviations:

SLST: Slip Stitch 

BLO – Indicates working into the Back Loop Only

HDC:Half Double Crochet ** All HDC stitches for this pattern are made into the back loop only**

CH: Chain

PM: Place Marker

MM: Move Marker

Sts: stitch(es)

Style Note: Capital lettered abbreviations indicate stitches made, lower case abbreviations indicate placement directions.

Materials:

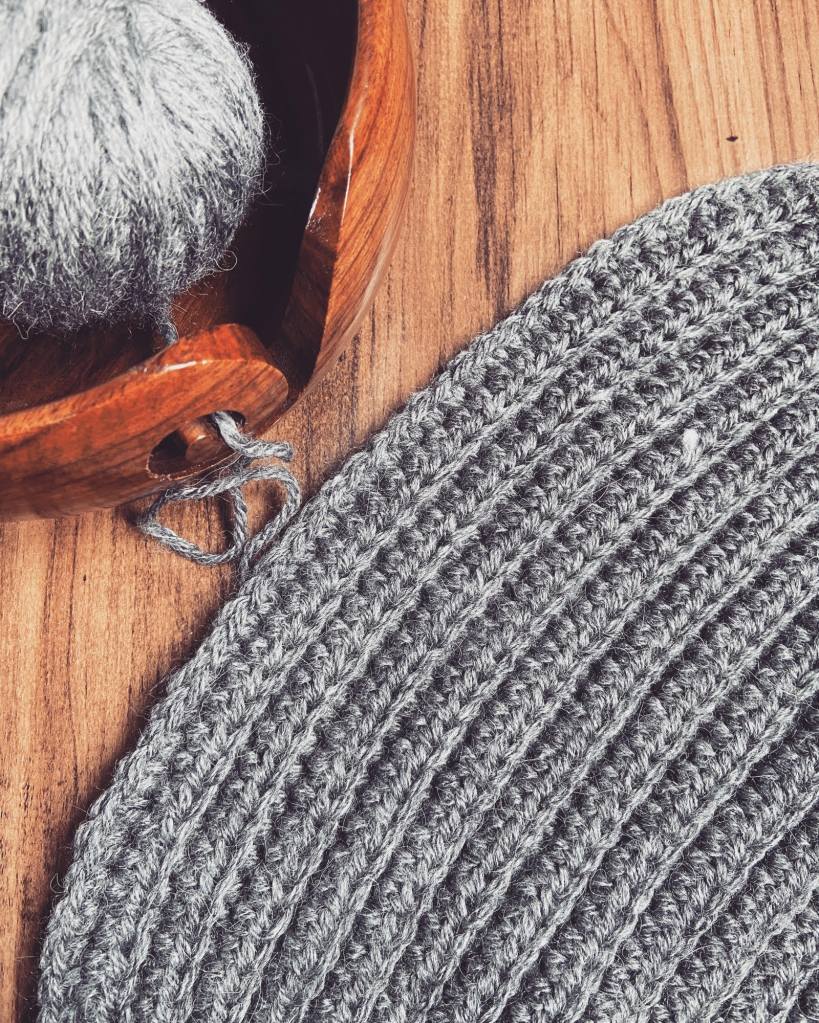
2-3 Balls (258 yds/ball) of Sirdar Snuggly Supersoft or comparable aran/worsted weight yarn 

S-M(L-XL, XXL) – 350 yds(417 yds, 499 yds)

5.5 mm crochet hook

Locking Stitch Markers (optional, but helpful)

Tapestry needle

Gauge:

(in HDC BLO)

4×4 = 14 sts by 20 rows

Finished Dimensions:

Choosing a Size: The ribbing for all sizes will comfortably boast about 1 ½” in additional stretch (width not circumference), and the calf portion up to an additional 3”.

To choose a size, measure the circumference of the fullest portion of your calf and choose the italicized approximate calf circumference that most closely matches your measurement.

Skill Level: Beginner +

Notes:

This pattern is worked flat and seamed or slip stitched to join the fabric into a tube which will become your leg warmer.

This pattern is written for one length. The fit is meant to be at the ankle and directly below the knee. Should you want longer leg warmers, simply increase the number of HDC stitches.

All stitches for this pattern are worked into the back loop only (BLO).

CH 1 does NOT count as a stitch.

Using locking stitch markers to indicate the separation between your slip stitch ribbing stitches from your HDC stitches is highly recommended.

Photo By Janine Mudge

Pattern (Make 2):

Begin by chaining 71

*REMINDER: All stitches are worked in the BLO*

Row 1: SLST into second CH from hook and for the next 14 sts, PM in last slst, HDC into next 40 sts, SLST, PM, Continue SLST to end. CH 1 and Turn. (70 sts – 15 SLST, 40 HDC, 15 SLST)

Row 2: SLST in 15 sts, MM, HDC in next 40 sts, SLST, MM, Continue SLST to end. CH 1 and Turn. (70 sts – 15 SLST, 40 HDC, 15 SLST)

*Stitch Count Remains the Same Throughout*

For Size SMALL-MEDIUM: Repeat Row 2 until you’ve completed 50 rows.

For Size LARGE – EXTRA LARGE: Repeat Row 2 until you’ve completed 62 rows.

For Size EXTRA EXTRA LARGE: Repeat Row 2 until you’ve completed 74 rows.

FINISHING:

Before binding off, join the long ends and loosely slip stitch into front loops only of corresponding stitches along the long edge to join into a tube. Bind off and weave in ends.

Once you are all done, enjoy dancing, working out, or just relaxing with these cozy legwarmers and be sure to share them on social media and tag me @TeaganandLu on IG and Facebook!

Featured

Tess Tank Top: A free beginner clothing pattern


 I have to admit that when I first started taking crochet seriously, I still resisted making garments. I gave myself about a million reasons why crochet garments just weren’t worth my time. As you know by looking at this blog, I like to keep things simple. I love crochet in its most calming form. I don’t need to overcomplicate things to get a lot out of my stitching, and in general, I just love simple, classic-looking pieces. So, I counted garments out for a really long time.

It wasn’t until I dove head first into designing that I gave garment making a try. And, let me tell you, once you go garment, it is so hard to go back. In the past year, I have dipped my toes into garment making and now garment designing and making wearable items is pretty addictive. 

Sidenote: I’ve also been studying up on just how to design garments that are more fitted and flattering to all sorts of body types. I have found so much inspiration through this book: The Crocheter’s Skill – Building Workshop by Dora Ohrenstein Fellow designers, or aspiring designers, this one is a must read. Once I work my way through it completely I will definitely dedicate a blog post to this one:

I still like to keep things simple, though. My favorite projects are completed in a few short sessions, and I’ll always love something that everyone feels like they can wear. And, I think the Tess Tank Top IS that garment. 

This piece can absolutely and easily be made by a beginner, and the result is a unique-looking, flattering top that really is for everyone. So, I decided to offer this top on my blog for free, in hopes that it would become your “gateway project” into tackling garments. 

This top is constructed really simply and can be easily adapted to get a custom fit. I hope you love making it. I’ve included the pattern here, but if you would like to purchase an Ad-Free PDF, that can be found on my Ravelry and Etsy sites (coming soon).

Also, the links you see below are affiliate links through Amazon and Lion Brand. This means that if you purchase something by way of the link I have provided, I get a small kickback. 

This top has been tested extensively, but always look at the comments below (and leave one too!) to make sure that I haven’t added or clarified anything since originally published. Without further ado, here is the pattern for the Tess Tank Top. 

I hope you love making it! Please share your finished makes with my by tagging me on Instagram or Facebook. Nothing makes me happier than seeing my designs come to life in your hands! 


Materials:

5.0mm Crochet Hook like my favorite clover hooks

Between 600 and 1500 yds of Lion Brand Comfy Cotton Blend Yarn (or any 3 weight yarn that is able to stretch easily)

(3 Pack) Lion Brand Yarn 756-709 Comfy Cotton Blend Yarn, Ocean Breeze

Measuring Tape

Tapestry needle

Safety pin style stitch markers

Scissors

Abbreviations:

CH: Chain

SC: Single Crochet

HDC: Half Double Crochet

DC: Double Crochet

EDC: Extended Double Crochet

IS: Iris Stitch (2DC in Same st, CH1, 2DC in same St)

SlSt: Slip Stitch

FSC: Foundation Single Crochet

Gauge Pattern:

Using the 5mm hook

Ch 22

Row 1: Beginning in second ch from hook, SC across. Turn.

Row 2: CH 2,* sk 2, IS* repeat across and EDC into last st.

Row 3: CH2, IS in the center of each IS from previous row. DC in final st.

Rows 4- 10: Repeat Row 3.

4×4=  4 Iris stitches (at their widest edge) by 5.5 Iris Rows

Sizing Guide and fit statement:

This garment is designed using the sizing guidelines from the Craft Yarn Council. It is designed as a true to size, close fitting garment. It is designed with 0-1” positive ease for the true measurements of each size, however, length of the top can easily be adapted to create a longer top (yarn amounts do not reflect these changes for each size).

Please examine the size chart below with special attention to the bust measurements to determine what size suits the fit you desire.

https://www.craftyarncouncil.com/standards/woman-size

Note on construction:

This piece is constructed by creating two flat panels and joining at the shoulder seams and sides. You will finish the piece by adding the neckline and sleeves as your final finishing steps.

The panels will be identical in size for this top, with the only difference being the added shoulder straps for the front panel.

After your first Iris rows, you’ll notice a slight curve to each of the panels. That’s OK! Once it is seamed, it should even out.

Obtaining a Custom Fit:

Should you choose to make this top a bit longer or wider than written, first measure the widest part of your body that the top will cover, and begin your FSC to match or exceed that measurement (foundation should be in multiples of 3 stitches), then simply measure your torso from the shoulder blade, over the chest, to area you’d like the top to begin to cinch. Work each panel’s Iris Stitches to that measurement. Continue on with the finishing directions.

Pattern notes

  • Stitch counts for each size appear in this format XS (S, M, L, XL)
  • Please contact the designer directly if you would like help converting to larger sizes. I am happy to help you get the best fit possible!
  • Turning Chain 2  stitches will always count
  • Turning Chain 1 stitches will never count

Pattern:

Front Panel — in 5.0mm hook

 FSC 48 (54, 60, 66, 72)

Row 1: Working into the first stitch from the hook, HDC into each CH across. CH 1 and Turn. 48 (54, 60, 66, 72)

Row 2: HDC across. CH 2 and turn.  48 (54, 60, 66, 72)

Row 3: *Sk 2, IS* Repeat across to last 2 st, SK 1 and EDC in final st.  CH 2 and Turn. 15 (17, 19, 21, 23 Iris Stitches)

Row 4: IS in each ch sp from the IS from the previous row. EDC in final stitch (turning chain from previous row). CH 2 and turn.

Rows 5 – 30 (32, 34, 36, 38): Repeat Row 4. (At the end of final row, CH 1 and Turn.)

Row 31 (33, 35, 37, 39) : SC in same st, *sk 1, SC* to end. SC in last two sts. CH 1 and turn. 39 (45, 50, 57, 63 SC)

Rows 32 (34, 36, 38, 40) – 36(38, 41, 44, 46) : SC in next  8 (10, 12, 12, 12) sts. Ch 1 and turn.

Break Yarn and attach at opposite side.

Repeat for opposite arm.

Bind Off.


Back Panel – REPEAT ROWS 1 – 31 (33, 35, 37, 39)

Construct Your Top:

With Wrong sides facing one another, use the mattress stitch to seamlessly attach the back and front panels at the shoulder.

Once joined at the shoulder, turn inside out and place a stitch marker where you prefer the armhole depth. CYC recommends 6” (6.5”, 7”, 7.5”, 8”) . Using your favorite method of seaming, seam both sides from the bottom, up to the stitch marker and flip right side out.

Finishing: Using the 5 mm hook

(Bottom Band is optional)

Bottom Band:

Along the bottom of your top (and working on the right side), attach yarn.

Round 1: SC around, joining with a SlSt. Ch 1.

Rounds  2 – Desired length: SC around. Joining each round with a SlSt.

Arms:

Round 1: Joining at the bottom of the arm hole, SC evenly around and SlSt.

Round 2: SC around joining with a SlSt.

Bind off and repeat on opposite arm.

Neckline:

With top right side out, attach yarn at the front right edge of the neckline.

Rounds 1 – 3: SC around in each st.

Weave in all ends and your top is complete!


Shop Amazon – Top Gift Ideas

Spa Set Free Pattern

Spa cloth, headband and scrubby — Patterns below

Not going to lie: I’m terrible at self care. It’s something I advise often, make sure my kids understand, and promise myself I’ll do, but I don’t often follow my own advice. But, hey, I often also say: Progress Not Perfection. Maybe I just need some time (and some cute accessories) to remind myself to take time off to really relax and take care.

I often insist my kids indulge in “Self Care Sunday”

In the spirit of hoping for progress in this endeavor, I’m sharing a favorite pattern bundle. I’ve given this set as gifts (and then subsequently have been asked to make them for other—so maker beware!).

There’s a spa cloth, headband and scrubby pattern included below and I really hope you like them!

It’s fair game to sell makes from these patterns, but please give credit if you are selling online. Please don’t publish this pattern as your own. That’s some seriously bad Karma…

Theresa Denham for Teagan And Lu

Simple Spa Cloth

offset_355676.jpg

Materials

About 90 yds of Bernat Maker Home Dec Yarn (or any weight 5 cotton yarn)

6mm Crochet Hook (US J)

Tapestry Needle

Two Stitch Markers

Scissors

Abbreviations:

CH: Chain

CH SP: Chain Space (The “hole” created by placing a chain stitch between two single crochets.)

SC: Single Crochet

SK: Skip a stitch

SlSt: Slip Stitch

Special Notes:

Use stitch markers to indicate the turning chain. This is where you will work your final stitches of each row. 

SC stitches for the body of the washcloth are worked into the Chain Spaces (Ch Sp).

Pattern

Chain 32

Row 1:  Working into the 2nd CH from the hook *SC, CH 1, SK* Repeat instructions within ** until the last stitch. SC into the end of row. CH 1 and turn. 

Row 2: SC into first CH SP, CH 1, SK, *SC into CH SP, CH 1, SK* Repeat from * across ending the row with a SC. CH 1 and Turn. (16 SC and 16 CH)

Rows 3 – 30: Repeat Row 2 to create a square. 

Without breaking yarn, create the border by adding two border rows around:

 Round 1:

CH 1, SC evenly along the side of your work. At each corner, SC 3 into same space and continue with even SC around the work. Sl St into first SC. 

Round 2:

Repeat round one and bind off. 

Weave in ends.

Theresa Denham for Teagan and Lu

Spa Headband

Materials

About 45 yds of Bernat Maker Home Dec Yarn

 (or any weight 5 cotton yarn)

6mm Crochet Hook (US J)

Tapestry Needle

Two Stitch Markers

Scissors

Abbreviations:

CH: Chain

CH SP: Chain Space (The “hole” created by placing a chain stitch between two single crochets.)

SC: Single Crochet

SK: Skip a stitch

SlSt: Slip Stitch

Special Notes:

Use stitch markers to indicate the turning chain. This is where you will work your final stitches of each row.

SC stitches for the body of the washcloth are worked into the Chain Spaces (Ch Sp).

Pattern

Chain 10

Row 1: Working into the 2nd CH from the hook *SC, CH 1, SK* Repeat instructions within ** until the last stitch. SC into the end of row. CH 1 and turn.

Row 2: SC into first CH SP, CH 1, SK, *SC into CH SP, CH 1, SK* Repeat from * across ending the row with a SC. CH 1 and Turn. (5 SC and 5 CH)

Rows 3 – 50: Repeat Row 2 to create a 16” band.

Sew the ends together to create a round. With the long tail of the yarn, wrap it around the seam to create a gathered headband. Weave in the end with a hook or tapestry needle.

Theresa Denham for Teagan and Lu

Reusable Cotton Rounds

Materials

About 45 yds of Sugar and Cream yarn  (or any weight 4 cotton yarn)

5mm Crochet Hook (US H)

Tapestry Needle

Scissors

Abbreviations:

CH: Chain

SC:  Single Crochet

PS: Puff stitch

SK: Skip a stitch

SlSt: Slip Stitch

Special Notes:

Find a helpful video for making the Puff Stitch here: 

Pattern

Round 1: Using the Magic Ring, Make 5 Puff stitches  and join by a slip stitch.

Round 2: CH 1 and pull up on the loop created by the CH stitch, and PS into the same space. Continue making PS around, working into the top of previous slip stitches and between the previous rounds Puff stitches. 

Round 3: Repeat Round 2.

Rounds 4-5: CH1, SC around and SlSt to the first SC worked.

Bind off and weave in Ends.

“The Little Things” Crochet Blanket— Free Pattern

This name is a little on the nose. Sometimes it’s the little things in life that keep you grounded, keep you moving and enjoying life. This blanket is so fast, so easy, and so beautiful that it is SO easy to enjoy.

I made the first sample in just one day and every member of the family fell in love with it. The little things: like kids who love the things you make, having just enough yarn to complete a project, sitting in front of a cozy fire with a fresh crochet project. All those little things just make each day worth it.

I really think that you’ll love making this blanket with this FREE pattern. And if you do, I would love for you to share it on social media to spread the love of the little things. Please use #thelittlethingsblanket on Instagram and Facebook when you make your own.

#thelittlethingsblanket

SO without further delay, here is the pattern:

Materials:

600 yds of Lion Brand Wool Ease Thick and Quick in Main color (Fisherman in the sample)

100 yds of Lion Brand Wool Ease Thick and Quick in a contrasting color (Fisherman in the sample)

11.5 mm Crochet hook

Tapestry Needle

Scissors

POM maker

Abbreviations:

FSC: Foundation Single Crochet

CH: Chain

sk: skip a stitch

SC: Single Crochet

HDC: Half Double Crochet

DC: Double Crochet

Notes:

All CH 2 turning chains DO count as DC.

Pattern:

Begin with 52 sts of FSC

Row 1: CH 2 (counts) *sk 2, 5DC, sk2, DC* Repeat across. (DC in last stitch) CH 2 and turn.

Row 2: 2DC in same st, sk2, *DC in third DC of 5DC from previous row, sk2, 5DC, sk 2* Repeat **to last st, 3DC in top of turning chain. CH 2 and turn.

Row3: *Sk2, 5DC, sk2, DC* Repeat ** to end. CH 2 and turn.

Rows 4 – 39: Repeat rows 2 and 3 (ending with a row 3– CH 1 and turn on final row of repeats).

Row 40: SC evenly across by *SC 2, sk1, HDC, sk 1* Repeat ** across. SC 2 In last two sts. CH 1 and turn.

41: SC across and Bind Off and weave in ends.

Finishing

Using yarn in a contrasting color and your Pom maker, make 6 large poms. Attack at the corners and the midpoints of the top and bottom edges of the throw blanket.

November, and last, Pattern!

It’s hard to believe that our project is coming to a close! This will be the final portion of the Stress Free Temperature Blanket provided by Teagan and Lu. I’ve decided to leave you to make some final decisions for the December stripe (either feel empowered to design your own, or repeat a favorite one we have stitched). Personally, I’m going to use my high and low colors for December to create a Moss Stitch border around my blanket to fulfill my December colors.  Check out my reflections on this project and a review of I Love this Yarn HERE (Coming Soon), as my final piece of work on this year long adventure. Thank you for stitching along with this project and I hope you absolutely love your blanket!

Materials:

200 yds Low Color  Yarn: Any worsted weight will do

200 yds High Color  Yarn: Any worsted weight will do

6 mm Crochet hook – (My favorite hooks are the light ergonomic ones, like this hook by Tulip)

Tapestry Needle

Notes:

yarn should not be carried

Ch1 will not count as a stitch. Ch 2 DOES count as a DC

Other turning chains are indicated in the directions per row.

November Pattern:

Row 1: HDC in low color across. CH 1 and Turn. (180 sts)

Row 2: HDC in low color across. CH 2 and Turn. (180 sts)

High color Row 3: sk2, 2DC in same st, *ch1, sk2, 2DCin same st* repeat across, but only place one DC in final st. CH3 (counts as DC + CH 1) and Turn. (59 V stitches (2DC in same st) plus 2 DC sts)

High color Row 4: *4DC between the 2DC from previous row, CH1* DC in final stitch Repeat across (298 total sts — 59 clusters plus two DC+CH1)

Low color Row 5: SC in same st, *SC in ch  sp, sk1, 2SC in between the second and third DCs of cluster from previous row* Repeat across to the last cluster. End with 1SC in the final ch sp and 1 SC in the last stitch (turning chain). This row should have 180 sts. CH1 and turn.

Row 6: HDC in high color across. CH 1 and Turn (180 sts)

Row 7: HDC in high color across. CH 2 and Turn (180 sts)

Low color Row 8: sk2, 2DC in same st, *ch1, sk2, 2DCin same st* repeat across, but only place one DC in final st. CH3 (counts as DC + CH 1) and Turn.

Low color Row 9: *4DC between the 2DC from previous row, CH1* DC in final stitch Repeat across (298 total sts — 59 clusters plus two DC+CH1)

High Color Row 10: SC in same st, *SC in ch  sp, sk1, 2SC in between the second and third DCs of cluster from previous row* Repeat across to the last cluster. End with 1SC in the final ch sp and 1 SC in the last stitch (turning chain). This row should have 180 sts. CH1 and turn.

High Color row 11: HDC across. Bind Off


October Pattern

For this month’s stripe, I was inspired by the falling leaves in Central Illinois. Outside my front window, which is the view from my coziest chair I use for working on new designs, I was inspired by the super bright yellow of the Linden trees in my front yard. These leaves were hard won. It’s the first year being in our home that we defeated a particularly tough swarm of parasites that have caused the leaves on these trees to fall off long before they have a chance to exhibit their Fall colors. So, they are beautiful, yes, but they are also a victory to my generally brown thumb and I’m really enjoying them.

I hope you enjoy this pattern. I’m always a fan of colorwork pieces, and when the colorwork end up easier than it looks, that a plus too! I think that’s the case here. Please enjoy!

Materials:

200 yds Low Color  Yarn: Any worsted weight will do

200 yds High Color  Yarn: Any worsted weight will do

6 mm Crochet hook – (My favorite hooks are the light ergonomic ones, like this hook by Tulip)

Tapestry Needle

Abbreviations:

CH: Chain

SC: Single Crochet

DC: Double Crochet

TC: Treble Crochet

SK: Skip a stitch

Notes:

All rows (including chain stitches where appropriate) should have a stitch count of 180.

When working Treble Crochets for this pattern, you will be working through the back of your work. There is a short video on my Instagram Channel (and IGTV) showing the placement of these stitches. I recommend watching them first!

You’ll begin working this pattern with the RIGHT SIDE facing you and in the LOW temp color.

Colors can be carried up the side for this pattern.

CH 2 always counts as a DC, CH 1 does NOT count.

Pattern:

You’ll begin working this pattern with the RIGHT SIDE facing you and in the LOW temp color. 

Rows 1-2: (LOW COLOR) DC in each stitch across. CH2 (Counts) and turn.

Row 3:  (LOW COLOR) DC into next stitch (as Turning Chain counts as a DC), *CH 1 SK 1 DC* Repeat across and end with a DC in the remaining stitch. CH 2 and turn.

Row 4: (LOW COLOR)DC into next stitch (as Turning Chain counts as a DC), *CH 1 SK 1 DC* Repeat across and end with a DC in the remaining stitch. CH 1 and turn.

Row 5: (HIGH COLOR) SC in first 2 sts, *TC in skipped stitch from the previous row, SC (in the previous row’s DC)* Repeat ** across. CH 2 and turn.

Row 6: (HIGH COLOR) Repeat Row 4.

Row 7: (LOW COLOR) Repeat row 5.

Row 8: (LOW COLOR) Repeat row 4.

Row 9: (HIGH COLOR) Repeat row 5.

Row 10: (HIGH COLOR) Repeat row 4.

Row 11: (LOW COLOR) Repeat row 5.

Row 12: (LOW COLOR) Repeat row 4.

Row 13: (LOW COLOR) DC across in all sts and chain spaces.


Thanks for joining me for this month’s pattern! It’s so hard to believe that this project is ALMOST complete. As a heads up for the coming months, there WILL be a November pattern dropping soon (likely before the end of the month), and I’ll encourage you to either create your own pattern for DECEMBER, or reuse one of your favorites from the year. This way, we can close out the year stress free and you’ll be free to finish up  your blanket with your own personal contribution to the theme!


Thanks for playing along with me and please visit me on Instagram at TeaganandLu where I’ll be hosting more (albeit shorter) CALs in 2020!

September Pattern

However delayed, here is the September pattern from yours truly! I hope you love this crazy mix of motifs that were new to me! I’ve tried my best to include some detailed photos and videos to help you along. Enjoy!!

Materials:

120 yds low color

95 yds height color

6.0mm crochet hook

Abbreviations:

CH: chain

SK: Skip

DC: Double Crochet

TC: Treble Crochet

TC2tog: Treble Crochet two together (you’ll work these in the skipped stitches two rows below)

B: bobble stitch — *yarn over, pull up a loop, yarn over, draw through two loops* Repeat ** three more times, yarn over and pull through all five loops on the hook. DO NOT CHAIN OVER TOP, move on to next stitch

Notes:

CH 2 at beginning will always count as a DC.

CH 1 at beginning will NOT count as a stitch.

An excellent tutorial for the arrow stitch can be found at: http://yarnandhooks.com/index.php/2019/07/06/crochet-arrow-stitch-tutorial-for-beginners/

I recommend watching the video BEFORE starting if this is an unfamiliar technique to you.

Pattern:

Starting on wrong side and LOW color:

Row 1: HDC across. Turn. (180)

Row 2: CH 2 (counts), *SK 2, DC in next two, working behind the last two stitches, DC into each skipped stitch —sometimes called “crossed stitches” in the pattern—, DC in next 2 sts * repeat sequence until 5sts remain. SK 2, DC in next 2 sts, Working behind, DC into skipped stitches. Finish with 1 DC. CH 1 and Turn.

Row 3 (high color): HDC 2, *work between set of crossed stitches and create a bobble, SC, HDC 4* repeat across. (You will end with 2HDC on the last repeat instead of 4)

Row 4: (low color) Repeat row 2. (See placement of cross stitches photo below)

Row 5: (high color) HDC across, CH 1 and Turn.

Row 6: *SC 3, ch 1, sk 1* Repeat across until last 4 sts. SC in final 4. Ch 2 and Turn.

Row 7: DC in each stitch and ch sp across.

Row 8 (Low Color): SC 1, TC in skipped stitch below, SK1, SC, CH 1 SK 1, SC, *work into Same skipped And then the next Skipped stitch TC2tog, SK 1 SC, CH1, SK1, SC* repeat across until 3 sts remain: TC in same skipped stitch, SK 1 and SC in final 2 sts.

For help with the arrow stitch motif featured here, visit this excellent tutorial–

http://yarnandhooks.com/index.php/2019/07/06/crochet-arrow-stitch-tutorial-for-beginners/

Also (my attempt at showing this motif):

Rows 9 – 13: Repeat rows 1-5 in the same colors as original

Row 14: (low color) HDC across. (180)

Free Pattern: The Old Fashioned Beanie


Materials:

4.50 mm knitting needles

5.50 mm knitting needles

135 yds of worsted weight yarn (recommended yarn is Mary Maxim Natural Alpaca Tweed)

4.5mm Double pointed needle or additional circular needles (for creating the double brim)

Tapestry needle

Abbreviations:

K: knit

P: Purl

K2tog: Knit two together (back loop for this pattern)

M1: Make 1 stitch

Recommendations:

Cast on with a stretchy Cast On (my preferred is the German Twist!), this will make picking up stitches easier and will ensure the stretchiness you want in the brim.

While the 1×1 ribbing on the brim contributes to the vintage look of this hat, if you want to work the underside of the brim in stockinette for speed, that works too! (If so, knit rounds 1-18 in Stockinette)

The hat will look small at this gauge, but the pattern allows for LOTS of stretch (If you want to make it a bit larger, cast on additional stitches in increments of 8.)

Gauge:

In 1×1 ribbing with 4.5 needle, a 4×4 square is 24 sts by 27 rows.

Pattern:

CO 76 sts with the 4.5 mm needles

Round 1: Join in the Round with a K stitch, placing marker to indicate beginning of round. P and Continue by repeating K1, P1 around.

Rounds 2-40: *K1, P1. Repeat around.

Create the Double Brim:

Along the cast on edge, pick up 76 stitches with a second circular needle (4.5 mm or smaller)

Round 41: Fold up brim, and Knit corresponding stitches together around.

See photo below for reference.

Tip: Knit the cast on tail in as you go to avoid weaving the end.

Body:

Round 42: Using the 5.5 mm needles, K around.

Rounds 43 – 44: K around.

Round 45 (increase): K4, M1, *K8, M1* Repeat around. (86 sts)

Rounds 46-75: K around (86 sts)

Decrease and bind off:

Round 76: *K19, K2tog through the back loops* Repeat ** around

Round 77: *K18, K2tog through the back loops* Repeat ** around.

Round 78: *K17, K2tog through the back loops* Repeat ** around

Round 79: *K16, K2tog through the back loops* Repeat ** around

Round 80: *K15, K2tog through the back loops* Repeat ** around

Round 81: *K14, K2tog through the back loops* Repeat ** around

Round 82: *K13, K2tog through the back loops* Repeat ** around

Round 83: *K12, K2tog through the back loops* Repeat around

Round 84: *K11, K2tog through the back loops* Repeat around

Round 85: *K10, K2tog through the back loops* Repeat around.

Weave long end into the remaining live stitches and cinch closed. Sew the top of hat closed and weave in end.

Yarn Review: Mary Maxim’s Natural Alpaca Tweed

If alpacas don’t bring you joy, are you even a knitter? Once upon a birthday, my super thoughtful husband contacted a (sorta) local alpaca farm and asked if he could bring me there to meet the alpacas as a surprise. They said yes and I had the TIME of my life. I learned so much, I made some friends and, while I liked alpaca yarns before going, I really think the experience made me just LOVE alpaca yarn.


BUT, I don’t always have the budget for pure alpaca yarns. So, I was so tickled to have two of my favorite yarn features: alpaca and tweed sent to me by Mary Maxim Yarns. (Note: I did receive this yarn for free from Mary Maxim with no expectation on a pattern or review but I felt moved to do both. All opinions are my own.)


Yardage: 262 yds

Price:

Fiber Content: 77% acrylic 20% Alpaca 3% Viscose

Recommended Needles: 5.0mm

Recommended Hook: 5.0 mm

Overall Quality – This yarn is SOFT. It’s a blend of acrylic and alpaca with a gentle halo of alpaca. I was immediately impressed with this yarn in the skein and working with it is even more impressive. I’m often leary of the amount of excess stretch that sometimes comes along with primarily acrylic yarns, and I was so pleased that this yarn is soft but not excessively stretchy. The tweed aspect of this yarn is also really well done. The specks of color and fiber are spun well into the yarn and really enhance the look of the yarn.

Value – Mary Maxim has this yarn listed on their website for 6.99 per skein and I think the yardage is really generous at  262 yds per skein. One way that I like to assess the Value of a yarn is if I think it’s a reasonable cost to buy a sweater’s quantity of the yarn. Given the generous amount of yardage per skein, I think that this yarn is of excellent value.

Color Selection – There is a wide variety of colors available for this yarn, and I’ve got a few pictured below. I love that the tweed bits in this yarn are all the same shades, so you could absolutely use a skein of each with some strategic striping to get a really interesting fade (this may be a hint towards something I am working on!).

Weight Analysis — There is a halo on this yarn, so I find that the actual spin is really nice, but the strand seems a bit on the lighter side of worsted. The recommended needle size is 5.0 for knitting, but I was more comfortable using 4.5 for this one because it’s delightfully light (I’m a DK girl at heart, so this was a feature I appreciated in this yarn). While I have only knit with this yarn, so far, I think it would be lovely to crochet with too.

Recommended Projects — I’ll let you know what each yarn is calling out to me to be made into. Because, yep, sometimes the yarn speaks to me (Please know I am not being literal. Yarn doesn’t talk. If your yarn is talking to you, please see a professional. Like a therapist. For real.)

Best Qualities – I love that this yarn is light worsted, I also absolutely love that the tweed is well spun into the yarn but still visible. I have definitely had other tweed yarns lose their tweed bits while working and that didn’t happen here at all. I love that the alpaca content is more than the 10% I’ve seen in other commercial yarns, and you can really feel a difference in the softness of the yarn. Also, while the washing instructions say that hand washing is preferable, I may experiment with machine washing this one. I don’t think at the current fiber content that it would felt, and that’s a plus.

Drawbacks — One of the reasons I chose this to be my very first review, is that I really don’t have any problems with it. I suppose if you don’t like a lighter type worsted (or don’t like adjusting needle size for gauge) you might not like working with this yarn, but for me that isn’t an issue at all. The only thing negative I can say about this yarn is that there were a few manufacturer made knots in the yarn, BUT even with that, because the knots are small, and tweed lends itself to some areas where the yarn is thicker than other, it really didn’t bother me! I only found one knot in each of the 262 yd skeins, too, so it was a forgivable flaw. Also, this yarn does shed fiber a little bit, so while I didn’t mind it while working, I am curiousl to see how the finished piece holds up over time.

Pattern:

I am so happy to share a new free pattern: The Old Fashioned Beanie. This beanie is super special in lots of ways. It’s unisex, extremely stretchy and has a cool, vintage look to it.  You can find the pattern HERE.

Links:

https://www.marymaxim.com/yarn/mary-maxim-natural-alpaca-tweed.html

Introducing: Teagan and Lu’s Yarn Reviews

Sometimes, when things aren’t going totally well in life, I find super solace in just taking a moment to list the things that I love, and the things that I’m grateful for. It always grounds me. It brings me back to ME and seems to set all the good things back into motion. It’s not a trick that works for everyone, but it works for me.

In the last year since starting this humble little blog, I’ve had a lot of these moments regarding the life of my “business.” I’ve struggled so much with intention, with deciding what shape my ambition for this little web space has been, and squaring that with the pressures and expectations I absorb and perceive from the rest of our yarny community and mostly from myself. So, the thing I apply to my life woes, I tried applying to my yarn life and it gave me so much clarity, so here it is. I love:

  1. Buying Yarn

  2. Trying Yarn

  3. Finding favorite yarns

  4. Creating original patterns

  5. Having meaningful interactions with other creative people

  6. Collaborating with people I admire

  7. SHARING what I create

It was also really helpful for me to list the things that I don’t like about my yarn life, but for now I’ll keep those things private. It’s a post for another day, and I think I’ll get to sharing that, but just not yet.

I took a while to reflect on those things and thought long and hard about how I could take ONLY the things I love, and use them to really turn my hobby/business into a TRUE passion project.

I’ve taken into account my limitations, and tried to adjust my plans for my business keeping those in mind.  After hitting the ground running with this little design biz, I prided myself on being a workhorse and being able to get a lot of work done in a short amount of time. But over time, I realized that I was missing some important moments yarning while playing with my kids, or pulling all nighters to finish a project. I realized that they don’t call it “slow fashion” for nothing and pushing SO hard to keep up with the folks I admire wasn’t actually helping me. It was burning me out and challenging my normal focus on calmness and kindness and pushing me into a space I didn’t want to be in anymore.

SO, what the heck does this all mean? It means that Teagan and Lu is evolving and switching gears a bit. Teagan and Lu now has a primary focus: YARN REVIEWS!

Guys, all heaviness aside: I love yarn, and I love all of you. I want to try the yarns. I want to buy (or be gifted, wink wink) the yarns. I want to tell YOU about the yarns. That’s where I find my happy, so I’m going to give that slim focus a shot and see where it takes me.  Here, on this blog, you can expect (primarily) just one thing: honest and candid yarn reviews. I also have a goal of providing a FREE pattern alongside each of the yarns that I try, but it’s baby steps at this point.

Being the former teacher that I am, I’m going to offer my reviews to you based on the following criteria:

Overall Quality – I’m going to let you know what it’s like to work with this yarn. I’ll expose them for the good, bad and the unforgiveable (manufactured knots and all).

Value – I’ll assess the price of the yarn versus how much you get and whether my cheapskate self think it’s worth the moolah. I’m a bargain hunter through and through, so you can count on complete honesty in this arena. And, in the instances in which I’ve been provided yarn for reviews, I’ll tell you whether or not I’d shell out my own cash for the yarn.

Color Selection – Sometimes, I find yarns that I love but the colors aren’t my cup of tea (I’m looking at you, LB Jeans).

Spin — The quality of the spin for all yarns is something I can’t quite tell you how passionate I am about. But, you’ll find out soon. I don’t spin my own yarn, but I sure do notice it when I buy yarn. This is an area that I think is a bit overlooked when yarns are reviewed and I really look forward to learning even more about it as I try more yarns.

Weight Analysis — I’ll let you know some information that might be missing from your commercial yarn labels, like accuracy of the weight of the yarn, wpi and my impressions on where yarns fall on the weight scale (yes, puns will be included).

Recommended Projects — I’ll let you know what each yarn is calling out to me to be made into. Because, yep, sometimes the yarn speaks to me (Please know I am not being literal. Yarn doesn’t talk. If your yarn is talking to you, please see a professional. Like a therapist. For real.)

Best Qualities – I’ll sing the yarn’s praises in this section. I’ll tell you what I LOVE about this yarn, because there is always something I love.

Drawbacks — If the yarn is lacking in any area, I’ll give you my unfiltered thoughts. Let’s face it, we choose different yarns for different projects because they each have their benefits and drawbacks. I’ll give you the dirt on where the yarn is lacking in this section.

Patterns — Finally, I’ll recommend patterns for the yarn. I’m hoping to one day have an original free pattern for each yarn, but at times where that isn’t possible, I’ll point you in the direction of my favorites for that yarn.

So, I’m SO excited to be offering this new facet to my blog and I hope you will love it too.

For starters, Here are my first reviews:

Mary Maxim Natural Alpaca Tweed

Mary Maxim Simply Natural (coming soon)

Red Heart Heat Wave (coming soon — WITH a video!)

Lion Brand Luxe (coming soon)

If you want your yarn reviewed, please email me!